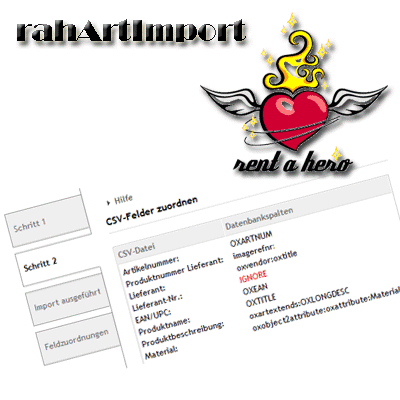
Der bewährte OXID eShop Artikelimporter ist endlich für die OXID 6 Version verfügbar! Per Composer installierbar, getestet mit der aktuellen Version OXID CE und EE 6.2.1.
Neben den Feldern der Tabelle oxarticles können auch andere Tabellen befüllt werden. Aktuell können Langtext (oxartextends), SEO-Keywords und Description (oxseo), Attribute (oxattribute, oxobject2attribute), Auswahllisten (oxselectlist, oxobject2selectlist), Hersteller und Lieferanten (oxvendor und oxmanufacturers) automatisch angelegt und zugeordnet werden. Es werden auch Auswahllisten neu angelegt, falls noch nicht vorhanden.Weiterhin ist es möglich, die Artikel in eine beliebige Kategorie zu importieren, es können auch automatisch noch nicht vorhandene Kategorien (hierarchisch) angelegt werden!. Ausserdem können aus Bildern, die per FTP hochgeladen werden automatisch alle relevanten Shop-Bilder generiert werden. Bilder können seit Version 2.3.0 auch von externen URLs heruntergeladen werden. Generell kann der Import beliebig oft wiederholt werden, die bereits vorhandenen Daten werden dann überschrieben/aktualisiert. Der Import kann auch per Cronjob automatisiert werden.
Ideal auch für Shop-Migrationen aus anderen Systemen.
Jetzt für nur 239 EUR zzgl. MwSt. – OXID Agenturrabatt möglich! Einfach eine Email an stefan@rent-a-hero.de senden!
If you have ever worked with Docker on MAC (or Windows without a recent linux subsystem), you know that working can be really, really slow … at least if any significant I/O is involved.
So, if you mount lots of files as a Docker volume, you *will* always get problems, period. Docker Sync etc. may help a bit, but usually that won’t be enough… and it adds additional complexity and problems.
Since Shopware 6 currently also mounts everything as a volume if you use Docker, the load times of the shop are pretty much horrible on MAC, something around 40 seconds (!) per page on first load.
Shopware is working on the Docker setup to improve it though, but here is a little workaround until that is available.
The trick is to only mount the folders you really need locally to work with, e.g. „custom“ (plugins) and „public“ (assets) folders into the container, instead of the complete „app“ folder.
The problem is, inside the container, you still need the other files and folders to have a working system.
So currently, the only solution is to clone the full GIT repo locally (on the host), adjust the standard docker-compose.yml file (change the volumes), lauch the containers and then, inside the container, basically clone everything again – so that is exists there, but is not mounted/connected to the „outside“ file system.
Here are the steps involved!
git clone https://github.com/shopware/development.git shopware_development
cd shopware_development
# optionally, clone platform, too
git clone git@github.com:shopware/platform.git
To make sure Mysql is still running, run „docker-compose up -d“ (or ./psh.phar docker:start)
Now go into the container again, this time as a regular user and basically clone the repo again – I’ve experimented with GIT „init + remote add … + reset –hard“ here to possibly keep the 2 mounted folders, but it wouldn’t let me clone then or throw some permission errors, so in the end I’ve deleted them:
./psh.phar docker:ssh
# inside the "app" folder here, there are only "public" and "custom"
# so we have to remove them and clone the complete repo again, inside the container!
rm -Rf custom public # may give docker warnings like "device busy", but should work ...
git clone https://github.com/shopware/development.git .
If the mysql container exits (that may happen a couple of times during the command executions), run „docker-compose up -d“ (or ./psh.phar docker:start) in another shell to start it again
Finally, open localhost:8000/ 🙂 It should look something like this now on your MAC:
Some Java language and ecosystem knowledge given, it’s not that hard to write your own plugin for the open source logging platform „Graylog“. There is a good documentation available at docs.graylog.org/en/2.4/pages/plugins.html, although some infos and example GIT repos seem to be a bit out of date currently, maybe due to the fact that Graylog 3 is around the corner.
Preparations
Besides git and maven, you should install the free IntelliJ IDEA CE – I tried with Eclipse and Visual Studio Code first, but didn’t get everything working there.
You will also need ElasticSearch and MongoDB running locally – the easiest way usually is with Docker – you can just create a docker-compose.yml file and fire up two containers, e.g.:
This will boostrap the latest „master“ version of Graylog, currently this is 3.0.0-alpha.5. If you want a different, e.g. the latest stable version, add the „manifest“ parameter (see here), e.g.:
--manifest="manifests/2.5.json"
Now comes the first caveat – there is no „scripts“ dir anymore inside „graylog-project“ (see github.com/Graylog2/documentation/issues/473), which you’ll need later on to create some boilerplate code for your new plugin. I assume this is going to be fixed / replaced once Graylog 3 is final. So currently you need to get the „scripts“ from an older branch at github.com/Graylog2/graylog-project/tree/pre-graylog-project-cli You can just download the branch as zip and extract the „scripts“ folder into your „graylog-project“ dir which was created in the step before.
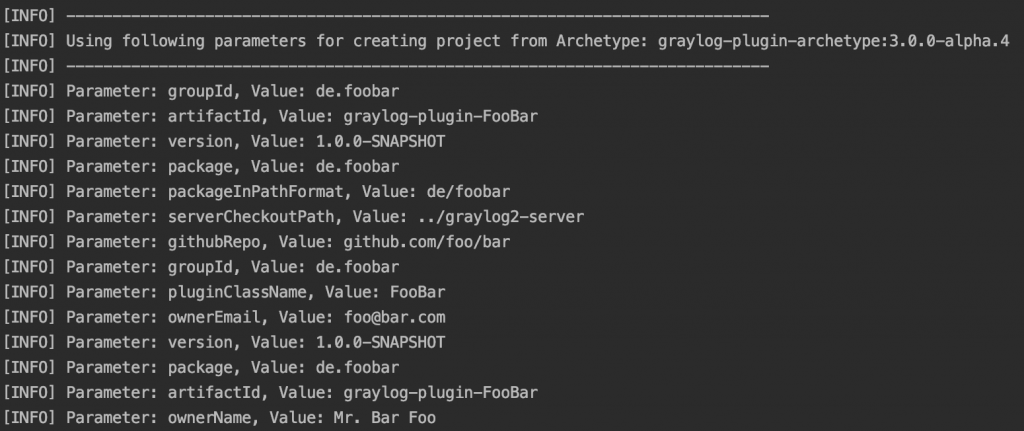
UPDATE: you can get along without the „scripts“ dir to generate a new plugin (see e.g. here), simply use Maven directly. Inside the folder „graylog-project-repos“, open a terminal and enter:
and enter the required plugin info. (You will still need to fix the plugin path in the main project POM and the parent project version and yarn.version variable in the plugin POM, see below.)
Continue following the README and import the „graylog-project“ as a new IntelliJ project and also create a new „Run“ configuration as explained.
After that, open the IntelliJ terminal window (or an external console if you prefer), change to the „graylog-project“ folder and run „maven clean install“ to generate and store all required project artifacts, otherwise you won’t be able to run your plugins‘ maven targets later because of missing dependency jar files, e.g. for graylog-server.jar
Finally, create a „graylog.conf“ file as explained here. Remember you have to fill at least two variables in there: password_secret and root_password_sha2. See the comments in „graylog.conf“ how to set those.
Creating your own plugin
If you have „installed“ the „scripts“ folder and didn’t use Maven to generate the plugin (see above), open „scripts/includes“ now and change „modulesPrefix“ to:
modulesPrefix=../graylog-project-repos
so that the „bootstrap-plugin“ command can find its dependencies. To create a new plugin skeleton now, stay in the „graylog-project“ folder and run:
scripts/bootstrap-plugin your-plugin-name
and enter the info requested, e.g.:
You can ignore the build and „file not found“ errors at the end for now – the script still has some path problems and there is no file „build.config.js.sample“, but it should have generated your new plugin folder and files. Now move the newly created „graylog-plugin-your-plugin-name“ folder one level above into the „graylog-project-repos“ folder (if you’ve used Maven to generate the plugin, it should already be there, see above!).
Now, for both cases (Maven or „scripts“), adjust the „graylog-project/pom.xml“ file from
(or add the entry if not there) and you should see it in your IntelliJ project folders. Also in „graylog-project-repos/graylog-plugin-your-plugin-name/pom.xml“ fix the version for „graylog-plugin-web-parent“ – for me, it was „3.0.0-alpha.3-SNAPSHOT“ although I was on Alpha 5 (check the version you are working with and change accordingly):
And, to finish it, in that same file change the following line, otherwise IntelliJ gives you the error: „Element yarn.version is not allowed here“ – that’s probably some typo in the boilerplate code.
<!--
<yarn.version>${yarn.version}</yarn.version>
change to -->
<yarnVersion>${yarn.version}</yarnVersion>
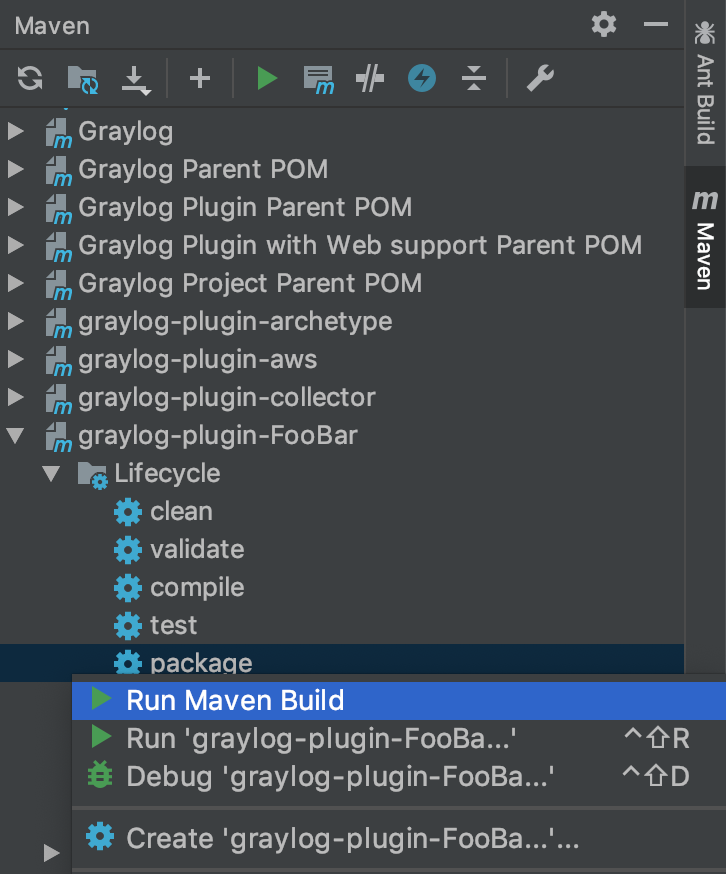
Now everything should be green in your IDE and you can e.g. run „mvn package“ for your plugin or do the same inside IntelliJ – in the „Maven“ Tab, first hit the left double arrows icon on top to „Reimport All Maven Projects“, then expand your new plugin, expand „Lifecycle“ and right click on „package“ to select „Run Maven Build“:
If all goes well, you should get the message „Process finished with exit code 0“ and you will find a newly created *.jar file in the „target“ directory of your plugin folder. All that is left to do is copy it over to the „graylog-project-repos/graylog2-server/plugins“ folder (create it if it is not there yet) – this location is defined in „graylog-project-repos/graylog2-server/graylog.conf“.
After that, start your new „Run configuration“ in IntelliJ to fire up the Graylog server and watch the logs if your plugin shows up. For the web interface, change to „graylog2-server/graylog2-web-interface“ and run
Bei einem Projekt ergab sich kürzlich die Notwendigkeit, MySQL Statusinformationen in ein Graylog Logging System zu bekommen. Allerdings durfte der Webserver durch die Firmen-Firewall nur über die Standard-Ports 80 und 443 nach aussen kommunizieren und konnte so nicht z.B. über UDP selbst Daten an Graylog senden.
Daher entstanden zwei kleine Graylog-Plugins, um einerseits die Daten (mittels PHP) über das Internet verfügbar zu machen und andererseits diese Daten vom Graylog-Server aus mittels „Polling“ abzuholen. Dies übernimmt ein sog. Graylog Input-Plugin (Java). Beide Plugins stehen im Graylog Marketplace kostenlos zum Download zur Verfügung.
Leider konnte ich die Session „Gitea plus Drone.io als Alternative zu Gitlab CI, Jenkins und Co.“ beim letzten DevOps-Camp Compact aus Zeitgründen nicht halten, aber hier zumindest meine Slides zum Thema – Drone – Gitea – CI
OXID 6 steht in den Startlöchern. Während sich oberflächlich nicht viel ändert, wurde der Shop-Core deutlich entschlackt und modularisiert. Nicht zuletzt ist es nun möglich und erwünscht, sowohl den Shop als auch Erweiterungen / Module per Composer zu installieren.
OXID hat sich viel Mühe gemacht, damit Shop-Updates und Modulübernahmen trotz großem Refactoring, der Einführung von PHP Namespaces usw. nicht allzu schwer fallen, u.a. gibt es einen eigenen Layer, der alte Klassennamen auf die neuen Namespace-Klassen mappt. So sollten die meisten bestehenden Module lt. OXID ohne jegliche Anpassungen zumindest zum größten Teil lauffähig sein.
Nichtsdestotrotz sollte man sich natürlich dennoch die Mühe machen, Module korrekt zu portieren, d.h. Namespaces einzuführen, DB-Zugriffe anzupassen, die „metadata.php“ zu aktualisieren, eine „composer.json“ zu erstellen usw.
Neue Module erstellen
Wir wollen nun jedoch versuchen, ein komplett neues, über Composer installierbares Modul zu erstellen.
Nachdem der Shop ebenfalls über Composer installiert wurde (Document-Root im Webserver auf das erstellte „source“-Verzeichnis setzen!), müssen wir in der OXID „composer.json“ unser Modul-Repository einfügen und das Modul als Requirement ergänzen. Falls es noch kein GIT-Repository gibt, kann Composer auch aus ZIP-Dateien installieren. Das wollen wir nutzen und fügen der „composer.json“ von OXID selbst ein „ZIP-Repository“ hinzu:
Wichtig ist hier, wenn man ein ZIP verwenden will, auch an dieser Stelle den Autoloader für eigene Namespaces zu konfigurieren, ansonsten können die Source-Dateien später nicht automatisch von OXID geladen werden.
Für ein „richtiges“ GIT-Repository sähe dies z.B. so aus:
Spätestens beim nächsten „php composer.phar update“ sollte das zusätzliche Modul automatisch mit installiert werden.
Das Modul selbst
Im Modul-Repo selbst sollte man direkt die Modul-Dateien im Hauptverzeichnis ablegen, die Verzeichnisstruktur unter „modules“ wird beim Composer Install automatisch angelegt.
Zentral ist hier natürlich die „composer.json“ für das Modul selbst, hier muss man v.a. zwingend den „type“ auf „oxideshop-module“ setzen, damit der korrekte Composer Installer aktiviert wird, ausserdem muss auch hier der Autoloader konfiguriert sowie mit „target-directory“ unter „extras“ das Installationsverzeichnis (relativ zum „modules“-Verzeichnis im Shop) des Moduls angegeben werden:
In den eigenen Modul-Klassen kann man nun ebenfalls Namespaces nutzen, z.B. hier ein neuer Frontend-Controller:
namespace MyVendor\MyModule\Controller;
use \OxidEsales\Eshop\Application\Controller\FrontendController as FrontendController;
/**
* A frontend controller…
*/
class MyDemoController extends FrontendController
{
…
Auch die Metadata hat einige Updates erfahren, Details hierzu finden sich in der Dokumentation, auch hier ist das OXID Paypal Modul wieder eine gute Referenz! Hier ein Beispiel für eine erweiterte Klasse und einen neuen, eigenen Controller:
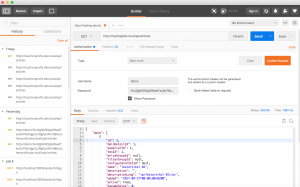
Der Shopware Shop stellt eine umfassende REST-API zur Verfügung, über die man z.B. Artikel auslesen bzw. bearbeiten kann.
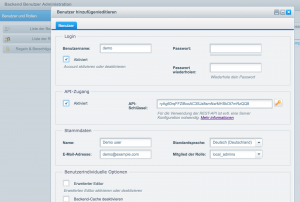
API-User einrichten
Standardmässig ist kein Benutzer mit API-Zugang angelegt, man kann jedoch einfach im Backend in der Userverwaltung für beliebige Nutzer API-Zugriff aktivieren und ein entsprechendes Token vergeben:
Mit der Kombination aus Benutzername und Token kann man sich nun „von aussen“ an der API authentifizieren, entweder mit Digest Auth oder HTTP Basic Auth.
Wir nutzen im folgenden HTTP Basic Auth, hier gibt es noch eine kleine Hürde – die Kombination Benutzername und Token muss „Base64“ enkodiert werden für die Anmeldung.
Für PHP findet sich in der Shopware Dokumentation ein CURL-Beispiel, wir wollen jedoch VueJS nutzen, um mit der API zu kommunizieren.
Kommunikation von VueJS aus
Auch für Javascript gibt es natürlich Möglichkeiten, die Login-Daten mit Base64 zu enkodieren, eine davon ist die Verwendung von „CryptoJS“. Dieses können wir uns mit npm bzw. yarn aus dem npm-Repository im Projekt installieren:
npm install crypto-js
oder
yarn add crypto-js
Die Verwendung in Vue sieht dann z.B. so aus:
import CryptoJS from ‚crypto-js‘; var secStr = CryptoJS.enc.Utf8.parse(apiUsername + „:“ + apiToken); var base64 = CryptoJS.enc.Base64.stringify(secStr); var options = {
So weit, so gut… allerdings hat man oft das Problem, dass die Javascript-Anwendung auf einem anderen Server liegt oder zumindest unter einer anderen (Sub-)Domain läuft, dadurch ist die Wahrscheinlichkeit groß, dass man Probleme mit dem sog. CORS (Cross Origin Resource Sharing) bekommt.
CORS Probleme
In diesem Fall kommt man nicht umhin, die Shopware Server Konfiguration anzupassen, um CORS zu ermöglichen. Am einfachsten gelingt dies in der Regel durch Anpassungen an der .htaccess-Datei des Shops, zumindest wenn man einen Apache Webserver nutzt.
Hier fügt man folgende Zeile ein:
<IfModule mod_headers.c>
Header set Access-Control-Allow-Origin „*“
</IfModule>
womit man Zugriff auf die Ressourcen des Shops von anderen (Sub-)Domains aus erlaubt.
Nun sollte die Javascript-Anwendung prinzipiell auf die Shopware REST API Endpoints zugreifen können. Allerdings zeigt sich schnell das nächste Problem.
OPTIONS „Preflight“
Trotz hoffentlich korrekter Zugangsdaten meldet Shopware beim Aufruf, dass der Zugriff nicht authorisiert ist und antwortet mit einem 401 Fehler. Wieso? Das liegt daran, dass bei der Kommunikation über einen AJAX-Request (XmlHttpRequest) vom Browser ein sog. „Preflight“ durchgeführt wird, als HTTP Methode wird hier „OPTIONS“ verwendet.
Normalerweise sollte eine Anwendung hier keine Authentifizierung erwarten bzw. verlangen – leider macht das Shopware aber standardmässig und der Request wird dadurch als nicht erfolgreich betrachtet, da vom Server ein „401 – Authorization failed“ zurückkommt. Jetzt könnten wir also ein Shopware Plugin schreiben, was eine Ausnahme für die OPTIONS-Methode implementiert, oder wir können wiederum über die .htaccess-Datei den „Preflight“ abfangen.
Letzere Option geht deutlich einfacher und sieht so aus – zuerst müssen wir das Setzen des CORS-Headers um „always“ ergänzen, damit dieser in jedem Fall gesetzt wird, danach wird der OPTIONS-Request direkt mit „200 – OK“ beantwortet und zurückgeschickt:
<IfModule mod_headers.c> Header append X-Frame-Options SAMEORIGIN # allow cross-site requests Header always set Access-Control-Allow-Origin „*“ Header always set Access-Control-Allow-Methods „GET, POST, PUT, DELETE, OPTIONS“ Header always set Access-Control-Allow-Headers „*, Authorization, authorization“ </IfModule>
While working on my VueJs product configurator I faced the challenge to call functions in a VueJs app from „outside“, meaning the VueJs app is e.g. integrated into a PHP shopping application like Oxid eShop, Shopware or Magento and I have to e.g. check the state of the current configuration inside the VueJs app.
In particular, I had to check if the configuration is finished when the „to basket“ button on the detail page of the shop is clicked and of course get the configured product back from the app to add it to the basket.
One way I’ve found to achieve this it to save the VueJs instance into a global window variable like this:
window.confApp = new Vue({
el:’#configurator‘,
render(h) {
return h(App, {
props: {
apiUrl:this.$el.attributes.apiUrl.value
}
})
}
})
This way, you can access it from anywhere on the page and add a script to a Smarty template of the shop e.g.:
$(function() {
$(‚#toBasket‘).on(‚click‘, function(e) {
console.log(window.confApp); return true;
} });
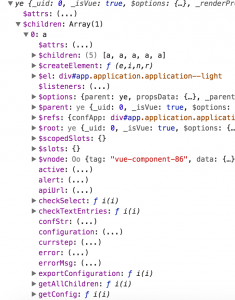
Now, to find the Vue Component inside the Vue object you can inspect the object in the browser console, it is probably nested in the „$children“ array of the Vue instance:
You can see the functions of the Component in the screenshot, the one we need is the „exportConfiguration“ which can now be called like this:
$(function() {
$(‚#toBasket‘).on(‚click‘, function(e) {
// get global configurator VUE instance
var configurator = window.confApp.$children[0]; var configuration = configurator.exportConfiguration(); if (!configuration) { return false; } return true; } });
Die Shopware CLI Tools ermöglichen es, das Erstellen von Plugins erheblich zu beschleunigen – egal ob es um Frontend-, Backend- oder API-Plugins (oder eine beliebige Kombination davon) geht. Im folgenden ein Beispiel für ein solches „Multi-Feature“-Plugin.
Shopware CLI Tools Installation
Wir erstellen mit den CLI Tools ein Plugin mit dem einfallsreichen Namen „MyTest01“, hierzu ist folgendes nötig:
Die Shopware CLI Tools gehören nicht zum Shopware „Lieferumfang“ und müssen erst installiert werden, empfohlen wird hier der Download eines „Phar“-Releases.
Man kann das Phar z.B. im Shopware-Hauptverzeichnis nach „bin/“ kopieren und der Einfachheit halber in „sw“ umbenennen.
Shopware CLI Tools Verwendung
Danach sind die Tools einsatzbereit. Hier ein Aufruf, welcher ein Plugin mit Frontend-, Backend- und API-Komponenten generiert:
Lässt man den Parameter „–backendModel“ beim Aufruf weg, so kann bzw, muss man das Model interaktiv in der CLI angeben:
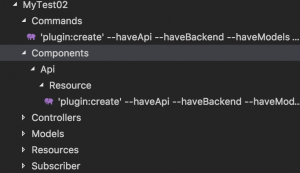
Wichtig ist in beiden Fällen, den kompletten Pfad bzw. Namespace mit anzugeben! Allerdings hatte ich mit der interaktiven Methode keinen Erfolg, es wurden keine gültigen Dateinamen generiert, sondern die kompletten CLI-Kommandos inkl. Parameter wurden als Namen verwendet – was zu ungültigen Datei- und Klassenamen wie diesen führt:
class ‚plugin:create‘ –haveApi –haveBackend –haveModels –haveFrontend –haveCommands MyTest02 extends ShopwareCommand
Kann evtl. an noch fehlender Kompatiblität mit Shopware 5.3. liegen, ich habe bisher mit älteren Versionen nicht getestet – oder es hat sich aktuell ein Bug beim Verarbeiten der Parameter eingeschlichen.
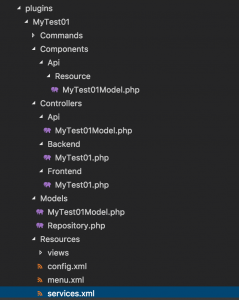
Übergibt man das „backendModel“ allerdings als Parameter, klappt die Generierung soweit:
Nach dem Generieren sollte man die Plugin-Liste aktualisieren (und ggf. den Cache leeren) mit:
Allerdings gibt es dann noch weitere kleine Probleme mit dem generierten Code, zumindest in der aktuellen Version 5.3 und falls man den Parameter „–haveApi“ bei der Generierung angibt.
Das erste Problem ist ein Fatal Error, der auftritt und ungefähr so lautet:
PHP Fatal error: Uncaught TypeError: Argument 1 passed to MyTest01\\Subscriber\\ApiSubscriber::__construct() must be an instance of Shopware\\Recovery\\Common\\DependencyInjection\\ContainerInterface, instance of ShopwareProduction4a3b86fd9a3e955627adbda985118ae3e2bdc589ProjectContainer given
Sieht man sich die generierten Klassen an und vergleicht mit ähnlichen Klassen im Shopware Sourcecode selbst, findet man irgendwann das Problem: in der generierten Datei „MyTest01\Subscriber\ApiSubscriber.php“ wird ein falsches Interface verwendet, man muss also folgendes ändern:
//use Shopware\Recovery\Common\DependencyInjection\ContainerInterface; use Symfony\Component\DependencyInjection\ContainerInterface;
Ausserdem muss, falls nicht vorhanden, dem Subscriber der „service_container“ als Argument in der „services.xml“-Datei mitgegeben werden, z.B.
Das letzte Problem schliesslich tritt auf, wenn man versucht, die API URL „/api/mytest01model“ aufzurufen (nachdem man vorher im Backend einen API-Key generiert hat, den man dann für das Login als Passwort nutzen kann), gibt es ebenfalls einen „Fatal Error“ a lá:
PHP Fatal error: Uncaught Error: Class ‚Shopware\\Components\\Api\\Resource\\MyTest01Model‘ not found in /var/www/html/engine/Shopware/Components/Api/Manager.php:55\nStack trace:\n#0 /var/www/html/custom/plugins/MyTest01/Controllers/Api/MyTest01Model.php(13): Shopware\\Components\\Api\\Manager::getResource(‚MyTest01Model‘)\n#1 /var/www/html/engine/Library/Enlight/Class.php(74): Shopware_Controllers_Api_MyTest01Model->init()\n#2 /var/www/html/engine/Library/Enlight/Controller/Action.php(101):
Hier muss man zwei Dinge anpassen:
in „MyTest01\Components\Api\Resource\MyTest01Model.php“ den Namespace ändern auf:
Fall übrigens durch ein fehlerhaftes Modul auch das Backend nicht mehr funktioniert, kann man das betroffene Modul über die Kommandozeile deaktivieren mit:
./bin/console sw:plugin:uninstall MyTest01
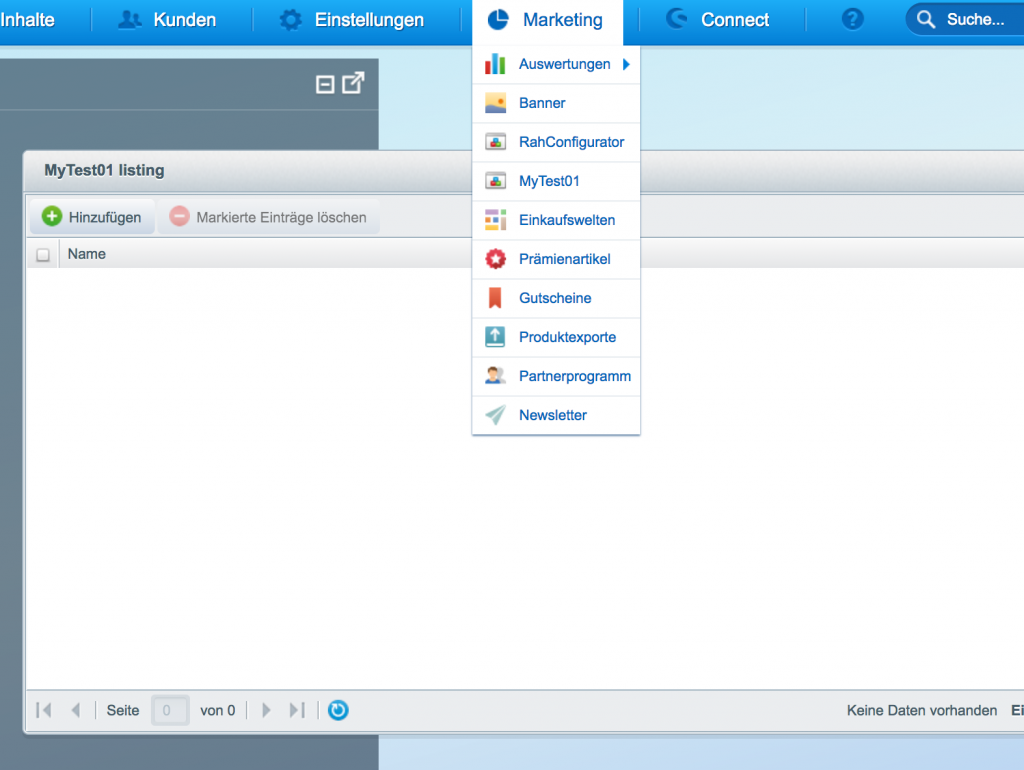
Unser Testmodul sollte nun jedoch funktionieren und nicht nur per API aufrufbar sein, sondern auch im Backend auftauchen: